今の時代、10人に1人はなにかしらの副業をやっているらしいです。
僕もその1人で、クラウドソーシング系のサイト(ランサーズやクラウドワークスが有名ですよね。)でエンジニア向けの案件を副業としてたまに受注したりしています。
しかし今やそれらの副業案件を受注したい人は僕以外にもたくさん存在しており、競争が激しいのでいかに素早く新着案件を発見、応募できるかが獲得率に大きく影響してくるわけです。
今回はその副業案件を素早く取得、そして応募を可能にするためのアプリをFlutterで開発してみましたという回です。
なお今回はランサーズの案件情報をスクレイピングという技術で取得します。
スクレイピングとは簡単に言うと、web上から必要なデータを収集してくる技術です。
これにより大量のデータをweb上から瞬時に収集することができるので、顧客リスト作成やデータ分析、機械学習に利用する学習データ作成などに応用ができる非常に汎用性が高いスキルです。
では早速作っていきます。
目次
開発環境
開発環境はこんな感じです。一箇所エラー起きてますが、今回はIntelliJは使用しないの無視してます。
ちなみに今回使用するエディタはVScodeです。
$ flutter doctor
Doctor summary (to see all details, run flutter doctor -v):
[✓] Flutter (Channel stable, 1.22.6, on Mac OS X 10.15.4 19E2269 darwin-x64, locale ja-JP)

[✓] Android toolchain - develop for Android devices (Android SDK version 30.0.2)
[✓] Xcode - develop for iOS and macOS (Xcode 12.4)
[✓] Android Studio (version 4.1)
[!] IntelliJ IDEA Ultimate Edition (version 2020.2.2)
    ✗ Flutter plugin not installed; this adds Flutter specific functionality.
    ✗ Dart plugin not installed; this adds Dart specific functionality.
[✓] VS Code (version 1.56.2)
[✓] Connected device (1 available)

! Doctor found issues in 1 category.
アプリ仕様
まずは簡単にではありますが、アプリの画面などの仕様を説明していきます。
画面
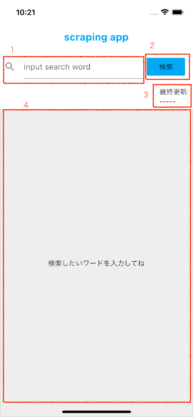
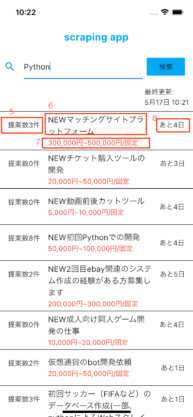
| No | 名称 |
| 1 | テキストフィールド |
| 2 | 検索ボタン |
| 3 | 最終更新 |
| 4 | 検索結果表示エリア |
| 5 | 現在の応募人数 |
| 6 | 案件名 |
| 7 | 設定されている単価 |
| 8 | 締め切り期限 |
・取得案件数は新着30件のみ
(ランサーズは検索結果1ページにつき30件の案件が表示されてるため。今回は新着案件のみ収集したいので2ページ目以降の古い案件は取得しません。)
・案件をタップすると外部ブラウザで案件詳細画面へ遷移。
・サイトのhtml構造が変化することによって今までスクレイピングできていた箇所ができなくなる可能性があるので、その際は手動でメンテナンスする必要がある。
開発
ライブラリ関係
なんとなく仕様が決まったので今回使用するライブラリを記載します。
| universal_html | 今回主役のスクレイピング用静的解析ライブラリ |
| url_launcher | 外部ブラウザを起動するライブラリ |
| intl | 日時のDataFormatを扱うために使用 |
それでは早速pubspec.yamlにライブラリを記載しましょう。
dependencies:
  flutter:
    sdk: flutter
  universal_html: ^1.2.4
  url_launcher: ^5.7.10
  intl: ^0.16.1
完成形のコード
とりあえず完成形のコードを掲載します。(ちょい長いです)
import 'package:flutter/material.dart';
import 'package:{ディレクトリ名}/home.dart';

void main() {
  runApp(MyApp());
}

class MyApp extends StatelessWidget {
  @override
  Widget build(BuildContext context) {
    return MaterialApp(
      debugShowCheckedModeBanner: false,
      title: 'Flutter Demo',
      theme: ThemeData(
        primarySwatch: Colors.blue,
        visualDensity: VisualDensity.adaptivePlatformDensity,
      ),
      home: Scaffold(
        backgroundColor: Colors.white,
        appBar: AppBar(
          elevation: 0.0,
          iconTheme: IconThemeData(
            color: Colors.orange,
          ),
          backgroundColor: Colors.white,
          brightness: Brightness.light, // ステータスバー白黒反転
          title: Text(
            'scraping app',
            style: TextStyle(
              color: Colors.lightBlue,
              fontSize: 20,
              fontWeight: FontWeight.bold,
            ),
          ),
        ),
        body: HomePage(),
      ),
    );
  }
}
import 'dart:async';
import 'package:flutter/material.dart';
import 'package:universal_html/driver.dart' as driver;
import 'package:intl/date_symbol_data_local.dart';
import 'package:url_launcher/url_launcher.dart';
import 'package:intl/intl.dart';

class HomePage extends StatefulWidget {
  @override
  _HomePageState createState() => _HomePageState();
}

class _HomePageState extends State<HomePage> {
  TextEditingController searchWordController = TextEditingController();

  // 案件リスト用
  StreamController listStreamController;
  Stream listStream;

  // 最終更新用
  StreamController updateStreamController;
  Stream updateStream;

  // スクレイピング結果格納用
  List<Map<String, String>> result;

  // 案件を検索する
  void search() async {
    // 検索ボックスに何も入力されていなければその時点でreturn
    if (searchWordController.text == '') {
      listStreamController.add(null);
      updateStreamController.add(null);
      return;
    }

    // スクレイピング中はローディング画面を表示
    listStreamController.add('waiting');
    updateStreamController.add('waiting');

    result = [];
    // 検索ボックスに入力したワードを代入
    String searchWord = searchWordController.text;

    final client = driver.HtmlDriver();
    // ランサーズの新着順ソートURL
    final url =
        'https://www.lancers.jp/work/search?keyword=$searchWord&show_description=0&sort=started&work_rank%5B%5D=0&work_rank%5B%5D=1&work_rank%5B%5D=2&work_rank%5B%5D=3';
    // Webページを取得
    await client.setDocumentFromUri(Uri.parse(url));
    // 単体の案件リストを格納
    final itemLists =
        client.document.querySelectorAll('.c-media-list__item');

    // アプリに表示したい情報を抽出してリストに格納
    for (int i = 0; i < itemLists.length; i++) {
      // 案件タイトルを取得
      final title = itemLists[i].querySelector('.c-media__title-inner');
      // 案件リンクを取得
      final link = itemLists[i].querySelector('.c-media__title');
      // 案件単価を取得
      final price = itemLists[i].querySelector('.c-media__job-price');
      // 提案数
      final propose = itemLists[i].querySelector('div > .c-media__job-propose');
      // 応募期間
      final limit = itemLists[i].querySelector('.c-media__job-time__remaining');

      // 案件1件毎のタイトル、リンク、単価、提案数、応募期間を配列に格納
      result.add({
        'title': title.text.replaceAll(RegExp(r'\s'), ''),
        'link': link.getAttribute("href"),
        'price': price.text.replaceAll(RegExp(r'\s'), ''),
        'propose': propose == null
            ? 'null'
            : propose.text.replaceAll(RegExp(r'\s'), ''),
        'limit':
            limit == null ? 'null' : limit.text.replaceAll(RegExp(r'\s'), ''),
      });
    }

    // streamに結果を流す
    listStreamController.add(result);

    // 最終更新表示用
    DateTime now = DateTime.now();
    initializeDateFormatting('ja');
    updateStreamController.add(
      DateFormat.MMMMd('ja').format(now).toString() +
          ' ' +
          DateFormat.Hm().format(now).toString(),
    );
  }

  @override
  void initState() {
    super.initState();

    // widget生成時にstream系変数を初期化
    listStreamController = StreamController();
    listStream = listStreamController.stream;
    updateStreamController = StreamController();
    updateStream = updateStreamController.stream;
  }

  @override
  Widget build(BuildContext context) {
    return Column(
      children: [
        Padding(
          padding: const EdgeInsets.all(8.0),
          child: Row(
            children: [
              Expanded(
                flex: 3,
                child: TextFormField(
                  keyboardType: TextInputType.text,
                  controller: searchWordController,
                  decoration: InputDecoration(
                    hintText: 'input search word',
                    icon: Icon(Icons.search),
                  ),
                ),
              ),
              Expanded(
                flex: 1,
                child: Padding(
                  padding: const EdgeInsets.fromLTRB(8, 0, 8, 0),
                  child: FlatButton(
                    onPressed: () {
                      search();
                    },
                    child: Text('検索'),
                    color: Colors.lightBlue,
                  ),
                ),
              ),
            ],
          ),
        ),
        Row(
          mainAxisAlignment: MainAxisAlignment.end,
          children: [
            // 最終更新
            Padding(
              padding: const EdgeInsets.all(8.0),
              //child: Text('最終更新:\n' + getTodayDate()),
              child: StreamBuilder(
                stream: updateStream,
                builder: (context, snapshot) {
                  if (snapshot.data == null) {
                    return Text('最終更新:\n' + '-----');
                  }

                  if (snapshot.data == 'waiting') {
                    return Container(
                      child: Center(
                        child: CircularProgressIndicator(),
                      ),
                    );
                  }

                  return Text('最終更新:\n' + snapshot.data);
                },
              ),
            ),
          ],
        ),
        // 案件表示エリア
        StreamBuilder(
          stream: listStream,
          builder: (context, snapshot) {
            if (snapshot.data == null) {
              return Expanded(
                child: Container(
                  width: double.infinity,
                  decoration: BoxDecoration(
                    color: Colors.grey[200],
                    border: Border.all(color: Colors.grey, width: 0.3),
                  ),
                  child: Center(child: Text('検索したいワードを入力してね')),
                ),
              );
            }

            if (snapshot.data == 'waiting') {
              return Expanded(
                child: Container(
                  child: Center(
                    child: CircularProgressIndicator(),
                  ),
                ),
              );
            }

            return Expanded(
              child: ListView.builder(
                shrinkWrap: true,
                itemCount: snapshot.data.length,
                itemBuilder: (BuildContext context, int index) {
                  // 募集期間が設定されている(募集終了していなければ画面に表示する)
                  if (snapshot.data[index]['limit'] != 'null') {
                    return Container(
                      decoration: BoxDecoration(
                        border: Border(
                          top: BorderSide(
                            color: Colors.black,
                            width: 1,
                          ),
                        ),
                      ),
                      child: ListTile(
                        title: Text(snapshot.data[index]['title']),
                        subtitle: Text(
                          snapshot.data[index]['price'],
                          style: TextStyle(color: Colors.red),
                        ),
                        leading: Text(snapshot.data[index]['propose']),
                        trailing: Text(snapshot.data[index]['limit']),
                        onTap: () async {
                        // 外部ブラウザで案件詳細画面を表示
                          final url = 'https://www.lancers.jp' +
                              snapshot.data[index]['link'];
                          if (await canLaunch(url)) {
                            await launch(
                              url,
                              forceSafariVC: false,
                              forceWebView: false,
                            );
                          } else {
                            throw 'ページが開けませんでした';
                          }
                        },
                      ),
                    );
                  } else {
                    return Container();
                  }
                },
              ),
            );
          },
        ),
      ],
    );
  }
}
処理の説明
// Webページを取得
await client.setDocumentFromUri(Uri.parse(url));
// 単体の案件リストを格納
final itemLists = client.document.querySelectorAll('.c-media-list__item');こちらsearchメソッド内部のスクレイピング関連の処理です。
itemListsに新着30件分の案件データをスクレイピングして格納しています。
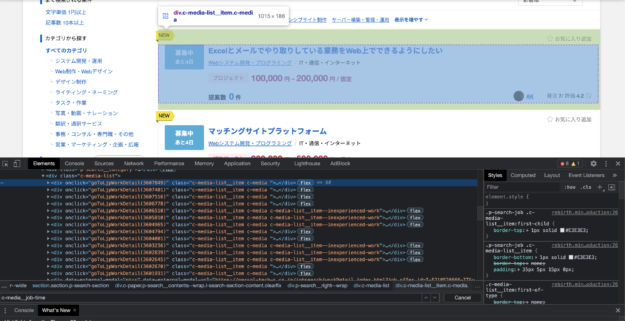
client.documentにURLのページのhtmlデータが格納されていて、その中のスクレイピングしたいhtml要素をquerySelectorAll()で取ってきています。
querySelectorAll()は引数で指定したhtml要素に当てはまる全ての値を取得してList型で返却してくれるメソッドです。
要素の指定はcssセレクターで行います。このケースだと「class名がc-media-list__itemの要素を全て取得してね」と指定しています。
for (int i = 0; i < 30; i++) {
      // 案件タイトルを取得
      final title = itemLists[i].querySelector('.c-media__title-inner');
      // 案件リンクを取得
      final link = itemLists[i].querySelector('.c-media__title');
      // 案件単価を取得
      final price = itemLists[i].querySelector('.c-media__job-price');
      // 提案数
      final propose = itemLists[i].querySelector('div > .c-media__job-propose');
      // 応募期間
final limit = itemLists[i].querySelector('.c-media__job-time__remaining');ここの箇所では30件の案件情報が格納されているitemListsからfor文で1件づつ取り出して、欲しい情報をquerySelector()で抽出している工程です。
querySelector()は引数で指定したhtml要素に最初に当てはまった値1つを取得してString型で返却してくれるメソッドです。
こちらも要素の指定はcssセレクターで行います。
ここのケースだと「最初に当てはまったclass名が〇〇の要素を1つだけ取得してね」と指定しています。
      // 案件1件毎のタイトル、リンク、単価、提案数、応募期間を配列に格納
      result.add({
        'title': title.text.replaceAll(RegExp(r'\s'), ''),
        'link': link.getAttribute('href'),
        'price': price.text.replaceAll(RegExp(r'\s'), ''),
        'propose': propose == null
            ? 'null'
            : propose.text.replaceAll(RegExp(r'\s'), ''),
        'limit':
            limit == null ? 'null' : limit.text.replaceAll(RegExp(r'\s'), ''),
      });
スクレイピングした情報をMap型で格納してそれを返却用配列に追加している工程です。
この際先程情報を抽出して格納した変数の中にはタグ名などの不要な要素も一緒に取ってしまっているので、変数の後ろに.textとつけることによって指定したタグ内の文字列のみを抽出してくれます。
.replaceAll(RegExp(r’\s’), ”)は同様に先程要素を抽出した際に半角、全角スペースが混じっていることがあるのでそれを削除しています。
getAttribute()は引数に指定したhtml属性を取得することができます。今回は‘href’を指定して.textと同じ感じで変数link内からリンクのみを取得してくれます。
proposeに関しては案件が募集終了ステータスだった場合nullが格納されてしまって、その後の.textでエラーになるので三項演算子を用いてエラーを回避しています。
この時点で変数resultの中身をVScodeのデバッグで確認してみるとこんな感じです。
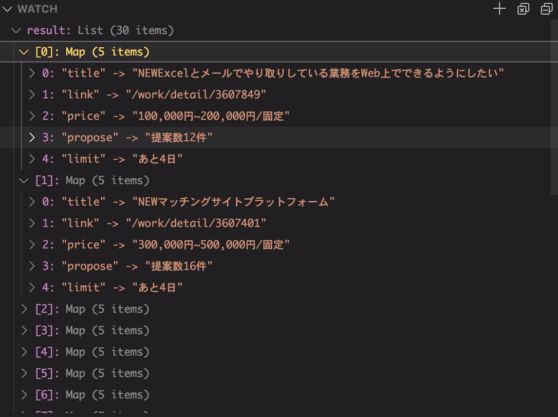
無事に30件分の案件名、詳細リンク、単価、応募数、締切期間が格納できてますね。
              onTap: () async {
                          // 外部ブラウザで案件詳細画面を表示
                          final url = 'https://www.lancers.jp' +
                              snapshot.data[index]['link'];
                          if (await canLaunch(url)) {
                            await launch(
                              url,
                              forceSafariVC: false,
                              forceWebView: false,
                            );
                          } else {
                            throw 'ページが開けませんでした';
                          }
                        },
こちらは画面に表示された案件のListTileをタップした際の処理になります。
まずタップした際に前にスクレイピングしたurl情報を使用して詳細ページURLを生成して変数urlに格納します。
その後if文でcanLaunchメソッドで実際に開けるURLなのかを確認、trueであれば実際にlaunchメソッドで外部ブラウザに自動に切り替わって引数に指定したURLに遷移します。
forceSafariVCはfalseを指定するとiPhoneでアプリを使っている際外部ブラウザで遷移させることができます。trueだとアプリ内ブラウザで遷移します。
forceWebViewは同様にAndroid側での挙動を設定できます。
どちらもデフォルトはtrueになっているので内部ブラウザで開く場合は省略可能です。
おわりに
ここまでざっとアプリの仕様や処理の部分を解説してきました。
まだ説明不足な箇所もあるとは思いますが、これを期に
「スクレイピングって便利じゃん!」
「Flutterでもスクレイピングができるんだー」
など感じてもらえたら嬉しいです。このアプリをベースにして新しく機能をつけたりして勉強がてら遊んでみるのもおすすめです。
(案件を30件以上取得してみる、ページング機能をつける、新着順以外でも取得してみるとか)
UI作る上で使用しているWidgetに関しての解説は今回しませんでしたが、それらWidgetの解説記事も過去に書いてるのでよければ他の記事も見て参考にしてみてください。
 【Flutter】Widgetのサイズを変更できるSizedBoxの使い方【サンプルコードあり】
 【Flutter】ListViewの使い方【サンプルコードあり】
指摘や改善点も是非お待ちしています。
おわり
